Tuesday, June 12, 2012

No Knead/No Roll Pie Crust June 12, 2012


   Here we are again, weeks since I have posted anything. I should have named this blog "No Time" because I seem to have no time to do anything anymore. Apparently the older you get the more you have to keep up with, the fast time elapses, giving you less and less time to accomplish more things. If that makes any sense. Scary that it does to me.

   In the vein of "no time" I was thinking about more shortcuts I could possibly post here to help all of you with dealing with this "no time" phenomenon. I came up with nothing, nada, zip, zero, nil, none. Oh, this is not good... My mind is a complete blank. However, someone very near and dear to me recently sent me an email telling me they looked on this blog to find a pie crust recipe. Oops, not here. I usually buy the premade ones from the dairy section at the grocery store--you know the ones that are rolled up in a tube and all you have to do is let them come to room temperature, unroll them into your pie plate, fill, cover, flute, and bake. That is very easy, but it is not homemade, which, as all of you know, I prefer.
   I responded apologetically that I do not "do" pie crusts, and you know what happened? My friend found a simple one pan recipe with no kneading and rolling and sent it back to me!  This blog is truly becoming a two-way street! Be still, my heart.
   So, in the spirit of shortcuts, sharing, and no-fuss-no-muss, I am trying out Himanee's shortcut pie crust find. 


           For a 9-inch crust:
           1 1/2 cups all-purpose flour
           2 teaspoons sugar
           1 teaspoon salt
           1/2 cup veg oil
           2 tablespoons milk. 

 Mix the dry ingredients together in the pan, then add the liquid and work it into a dough. Using your hands is not a problem since there is enough flour to absorb the oil without making a mess. No rolling necessary. Just pat it out with your hands. Bake it at 400 degrees for an hour and it's good to go (Gupta-Carlson).

  I plan on making my world-famous apple pie using this crust recipe, but I guess I will have to find a Dutch crumb topping since this recipe is only for a bottom crust, but we will see what happens. This would work great for pumpkin pie that only uses a bottom crust, and alleviate having an un-matched pie crust from the package.

Photos posted 11/22/2022 Finally  made it!


Source:

Gupta-Carlson, Himanee. Excerpted from a personal email on file with author. 2012.

Monday, May 14, 2012

Neighborly contributions

     When my father passed away on Long Island last month I spent three weeks at my brother's helping make arrangements and taking care of Mom, who, although knew it was time for him to go, was very, very sad, and not faring too well physically herself.
   I have to say my brother's neighbors were, each and every one, a Godsend. You would not believe the amount of food that showed up on the doorstep. Their timing was impeccable, as who could think about preparing meals for so many people while we all were reeling from the shock of losing our husband, Dad, Grandpa, and Great-Grandpa? Not many. My brother did have the presence of mind to grab a bunch of steaks and toss them into a marinade--we'd pick up macaroni and potato salads from the deli--oh, yeah, I'm back in civilization--real macaroni and potato salads that I didn't have to make! And we were going to go grab a few bags of prepared salads from the supermarket. 
   But two of the neighbors stopped by bearing gifts- that were sent by at least ten families that are my brother's neighbors-- a large peace lily, and two very large baskets of food stuffs. One basket had corn muffins and blueberry muffins, English muffins, a few boxes of cereals, a couple of boxes of Entenmen's doughnuts, granola bars, and breakfast bars. The other basket had a gallon of milk, orange juice, apple juice, 2 liter bottles of Coca-Cola and Sprite, and four bottles of wine. Wow!

     I was about to head out to go pick up the salads when I got called back to the kitchen. No need for the salads. My brother was packing up the steaks and sending them to the deep cooler out back. Apparently the neighbors bought us dinner, too. Five minutes later a delivery van was in front of the house. Trays and trays of food starting pouring in the front door. Eggplant Parmesan; chicken, tomato, fresh mozzarella, and artichoke salad; chicken tenders; baked ziti, with ricotta and mozzarella cheeses and baked until bubbly; sausage and peppers; a mountain of garlic knots; and two huge tossed salads with Italian dressing on the side. This was awesome! Most of us did not even realize just how hungry we were. There was something on the menu for everyone--even the picky eaters.
    I cannot say enough for the thoughtfulness of my brother's neighbors in Stony Brook. The selections Sal, the owner of Ole Solo Mio, made to make a complete and special meal for all of us were perfect, as was the quality of the food. I love the idea of the baskets of food and plan on using that idea in the future, when, inevitably, someone passes, to help one of my neighbors through a rough patch of life. 
   Let's just hope that the need does not come too soon, nor too often.


Eggplant Parmesan
Mountain of garlic knots


     What about you? Do you have a special dish you send to a neighbor in need?

Friday, May 11, 2012

Short-cuts

   Being away from my kitchen for three weeks has presented me with a challenge or two. Not having my own equipment like my Kitchen Aid stand mixer, is driving my a little crazy. I miss not making homemade bread, and with these hands of mine, and my wrist being sore for the last month, I cannot see myself even attempting to knead dough for bread. It's just not going to happen. Period.
   But, wait! Nowadays many bakery departments of grocery stores sell already made pizza dough. How easy can that be? Yeah, I think I'm in.
   Okay, so I'll grab a few pounds of pizza dough. I will let it thaw out in the refrigerator in its original bag. Then put it in a greased bowl, turn it once, cover it with greased plastic wrap and a kitchen towel, and let it rise for about an hour to an hour and half. Punch it down. Let is rest for 10 minutes. Okay, now what?
   Well, here's where we can get creative: to make Italian bread, roll out the dough into a rectangle about a foot long by 8 inches wide. Roll it tightly starting from the long edge. Dampen the edge of the dough and pinch it together, then roll it back and forth on the counter a few times to shape it into a nice looking long-ish loaf.
    Paint the dough with a beaten egg yolk, slash the top about 1/4 inch deep about every two inches across; sprinkle with granulated garlic, and/or sesame seeds. Bake in a preheated 350 degree oven for 30 minutes. Cool on wire rack for about 20 minutes and serve warm with soft butter.
   I can hear the nephews munching now!
   What else can you do with pre-made pizza dough other than make your very own pizza? A few things. But always start with thawing it out in the refrigerator in its original bag and then letting it rise in the greased bowl as previously described.
   Okay, the dough is ready. What do to with it? Hmm. I got a hinkering for some Zeppoles, you know the pieces of fried dough sprinkled with powdered sugar you can get at the Italian restaurants or carnivals and fairs during the summer? Oh, yeah.  The nephews are jumping up and down. Oh, yeah, touchdown without even starting to cook. I could get used to this!
   Okay, not being home, I have a small problem: no deep fryer, so I pull out a deep 3 quart saucepan, fill it about 1/3 full with canola oil and put it on high on the electric stove, turning the exhaust fan on to attempt to keep the aroma of hot oil from overwhelming the house. Actually I was trying to keep the evidence of this foray to a minimum, what my brother and sister-in-law don't know I pulled off in their kitchen is a good thing. Except, as you will learn, it was an effort in futility.
   The oil finally gets heated to 350 degrees, or thereabouts, as I do not have a candy thermometer to test the temperature. One little trick I have picked up over the years is how to determine if your oil is hot enough is to "drop a 1 inch square of bread into the oil. If it takes 60 seconds to brown, then the oil is at 365" (Rombauer, 1047). When the oil reached temperature I pulled a wad of dough, about 3 inches worth, off the edge of the lump of dough and gently dropped it into the oil. It sank to the bottom. 5-4-3-2-1-BINGO! The dough rose to the surface and was frying away in record time. Using a slotted spoon I gently moved the dough ball around and flipped it to make sure it browned evenly on both sides. Drained the little bugger on paper towel. Let cool about 2 minutes then liberally sprinkled powdered sugar over the top and tossed it. I cut into the little test piece--it was perfect-light and airy. I made the full two pounds of dough with the nephews gathered close by to scoff up the little beauties as soon as they were cool enough to handle. 
   I was able to send a few in to Grandma while she watched TV. She sent out her plate for "a few more". Not bad, for being out of my own kitchen, I thought. The boys just loved them, they immediately told their mother over the phone that "Aunt Barbara made Zeppoles" to which she asked, "in my kitchen?"
   I was afraid I might have started something Karen would not be happy with me about. Time will have to tell. In the meantime I found myself on the "favorite Aunt on their Father's side" list...cool.

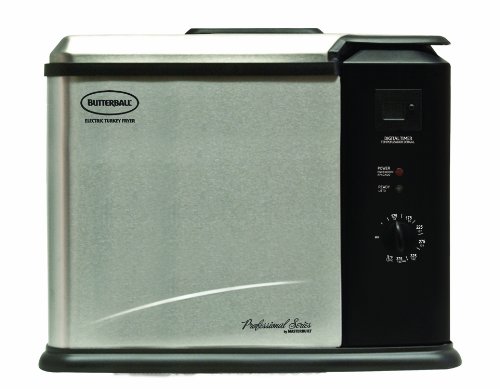
   The story gets a little funny here. Karen and Tony arrive back home from our sister's down south after the memorial service for our sister's husband that passed away unexpectedly, just days after our Dad passed. Karen sends the boys out to the car to bring in the big box from the trunk. Into the house comes an Indoor Butterball Turkey Fryer. Really? You can fry a turkey in the house? Who would have thought? Now Karen didn't plan on frying a turkey, but had never owned a deep fryer, so when Julie was giving hers away, Karen grabbed it, figuring I was at her house, we could play. 
    And play, we did! We made Zeppoles two more times and french fries, but we all agreed we had been having way too much fried stuff and this piece of equipment was too big to leave out on the counter. So we emptied it and cleaned it and nicely packed it up for its next use--probably in a year or so. It took quite an effort to get the smell of fryer oil out of the house, and off us, too. but it was fun, and I can honestly say, I do not plan on getting an indoor turkey fryer--that's one kitchen gadget I plan on skipping!


    So that's about it, for now, on some shortcuts I used while I was away from my beloved kitchen. How about you? Do you have any tricks to share? Love hearing from all of you!


Reference:
Rombauer, Irma, Rombauer, Marion, & Becker, Ethan. The Joy of Cooking. 75th Anniversary Edition. New York, NY: Simon and Schuster, Inc., 2006.Pg. 1047. Print.

Wednesday, April 25, 2012

Life sure can throw you some curves.

   Mid April brought much sadness to the life of this blogger. My father, 87 years old, succumbed to an illness he has had since 1982--not that he was horribly ill all this time, but he has been steadily failing for the last 12 years and this past 6 months have seen him become totally dependent on others for all of his care. It was becoming impossible to care for him at home, and he was waiting for an opening at the VA home--not that we wanted to put him there, but he needed more care than any of the family were equipped to provide. We lost him on April 16th, hours after the medical staff thought he would pass, but not before all of his family gathered in his MICU room in Stony Brook University Hospital. So, until we meet again, Dad, <3...
   Three days later, my sister's husband, who had stayed home in another state because he thought he had the flu, also passed. This one was sudden and quite unexpected. My family is numb. I can only shake my head in disbelief. How can this happen? I am sure this has happened before to some other family somewhere, and I can only say that anyone who survives back-to-back events like these have to have strong family ties and love to get through the pain. Only faith and love can see you through so deep a darkness.
    I am staying here on Long Island at my brothers for a few weeks to stay with Mom, while my brother heads down south to our sister's house. Mom cannot make the trip, right now, as she is not faring well physically. That she is not up to going to her daughter's is stressing her. It is a vicious circle. But one we believe we will rise above. We have to believe it.
    As I am not exactly thinking clearly I find my mind is blank as to what to post about cooking. I cannot think about cooking with all the food the neighbors have dropped at the door, or have had delivered. Heating things up is not exactly cooking, as I am sure my followers would surmise. So I plead for a temporary reprieve from the kitchen but promise I will be back soon.
    Don't ever pass on an opportunity to tell someone you love them, you just never know.
    Peace.

Thursday, April 12, 2012

Easter Bread April 12, 2012

    Holy cow, somebody stop the clock! It's already the first week of April. I am going to sound like a broken record, but, when did time start moving so fast? Jeepers!
   Easter is upon us this weekend and I have a lot of cooking to do. I am making Shrimp Scampi with homemade noodles for dinner tomorrow night. I guess I'll make bread, too. But I am going to make an Italian Easter Bread, also, for Sunday. It is a sweet bread (not sweetbreads), that is braided into a wreath and has colored eggs woven into the dough. My little old Italian grandmother made it every Easter. Of course she passed without sharing her recipe, but with this new newfangled invention called the internet, I have located a recipe that looks and sounds so much like it would be the recipe she used, or a close second, I am going to attempt it on Saturday. Yeah, you know me, forever the mad scientist!
     I found the recipe online at a club called Just a Pinch Recipe Club, which is a members only site, however, it doesn't cost anything, you just have to sign up. Me connecting with other avid cooks sharing recipes and secrets? Oh yeah, I'm in!
   Anyway, I followed the recipe nearly exactly (yes, yes, you know me!), but I did not have any fresh lemon, therefore no lemon peel to grate. Hmmm. what to do? After researching the internet for appropriate substitutions I decided to go with 1 tsp of orange juice to replace the lemon peel. The chemistry of lemon juice is too acidic to properly attain the same results as the peel- orange juice--being sweeter than lemon juice, I decided would be a better alternative. I was not disappointed. the bread had a little brightness that the lemon peel was meant to introduce, and the milk didn't sour as it would have had I used lemon juice. Mental note: you can substitute 1 teaspoon orange juice for 1 teaspoon grated lemon peel in bread recipes.

Italian Easter Bread

2-1/4 teaspoons active dry yeast (that's one packet)
1/4 Cup warm water 110 to 115 degrees F.
1/2 Cup butter (softened)
1/2 Cup sugar
6 egg yolks
1/2 tsp salt
3/4 Cup warm milk
1 tsp orange juice
2 tsp vanilla
4 1/4 Cups flour
1 tsp melted butter
1 egg white, scrambled
6 colored eggs (raw)

Dissolve the yeast in 1/4 Cup warm water.Cream the butter with the sugar until light and fluffy.Add the salt and then the 6 egg yolks, one at a time until completely incorporated. Stir in the warm milk, the OJ and then the vanilla. Mix well. Add 2 cups of the flour and beat for 5 minutes. Gradually stir in the rest of the flour (switch to the dough hook on your stand mixer, if using). Knead for about 5 minutes, until the dough is smooth and elastic.This dough is on the stiffer side. Place dough in a greased bowl, drizzle a little melted butter over the top. Cover and let rise 1-1/2 to 2 hours. Punch down and knead for a few minutes again. Let rest 10 minutes. Separate dough into three equal portions and roll out into ropes. Braid the ropes into a wreath, placing colored eggs within the braid spaced equally all around (see photo). Brush the dough with beaten egg white and allow to rise about 1 hour.  Then place into preheated 325 degree oven, 45 to 55 minutes. Let cool on wire rack. I did end up glazing the bread (as it is a sweet bread) with 1 cup of powdered sugar, 1/2 tsp of vanilla and 1 tablespoon of milk, mixed well, and drizzled over the top.
   I have made this bread before and never had a problem with the raw eggs. Not so lucky this trip. One egg did crack and ooze out a bit, and was still liquid when the bread was otherwise done. I just shut off the heat to the oven, and left the bread in the oven for another hour. It did not harm the bread, but the eggs were cooked through, which is what I was looking for. I tend to think there was something wrong with that particular egg, as I have made this several times before, as did my grandmother, and many other people from  the club, who did not have problems with their eggs exploding. Just one of those things you cannot predict, I guess.
   Here's a photo before the glaze. I will post a post-glaze photo as soon as I get it off my phone.
   What special treats do you prepare for your family's holiday? I love to hear from you!

Tuesday, March 20, 2012

Coconut Torte Day/ Pina Colada Torte March 20, 2012

   March 13 was Coconut Torte Day. Oh, yum, I do love coconut! But, what, you may ask, is a torte? I found two rather different variations of tortes: one is a cake made with many eggs and very little flour; the other is a rich, multilayer cake usually covered with cream and fruit or nuts. Either way sounds just perfect to me.
   I am going to make a Pina Colada torte in celebration, which uses shredded coconut as the crust. Of course, not everyone here is very fond of coconut, the number one son is not a big fan, but he is a sweets fan, so I might be able to pull this off. 


 Pina Colada Torte

2 2/3 cups of flaked coconut, separated, toasted
4 tablespoons melted butter

Mix 2 cups of the coconut with the melted butter and press into the bottom of a springform pan. Chill.

1 (14-ounce) can sweetened condensed milk (NOT evaporated milk)   
2/3 cup Cream of Coconut which actually weighed 15 ounces
 1/4 cup light rum or 1/8 teaspoon rum flavoring  
 1 (20-ounce) can crushed pineapple, well drained   
2 cups (1 pint) whipping Cream, whipped      
Maraschino cherries, optional 

In large bowl, combine sweetened condensed milk, cream of coconut and rum; stir in 1 cup pineapple. Fold in whipped cream. Pour half the cream mixture into prepared pan; sprinkle with 1/2 cup coconut. Top with remaining cream mixture. Freeze for 6 hours or until firm. Gently remove outside ring. Garnish with remaining pineapple, coconut and maraschino cherries if desired.  
   Of course to bump this up a few notches, you can use maraschino cherries marinated in moonshine--they are both legal and available in liquor stores in New York State; thanks to  number two son for that little contribution.
  The mixing was very easy. I learned that 2/3 cup cream of coconut measures out exactly one 15 ounce can--perfect, what would I do with a smidgen of cream of coconut, anyway? Of course, knowing me the way you do, do you really believe I followed the instructions to the "T"? Of course not! I just added the 1/2 cup of coconut right into the mix instead of doing the layer technique, not a big variation, but I try to tell you exactly what I do to get my results.  I also did not purchase crushed pineapple, but ran a 20 ounce can of pineapple chunks through the food processor and let it drain over a pot for about 2 hours. I have never had a problem with this substitution, and I buy the chunks by the case at the local warehouse club; they do not sell crushed pineapple, so I make do with what I can get.
   The torte is now in the freezer, I will garnish it with the very little pineapple and coconut that is left, and put on a maraschino cherry, or two, for anyone who is daring.
   I did contemplate sweetening the whipped cream, but thinking about it, it was going to be combined with sweetened condensed milk, so I let it ride--in other words I used straight whipped cream, no sugar, no vanilla. Tasting the mixture from the drop that was left in the bowl after I poured it into the crust, I am glad I did not sweeten the cream.
   I have made this early enough to enjoy for dessert tonight. And I have a full house, as number three is home for spring break, plus one. The more the merrier when it comes to the dinner table.
    The torte came out awesome, even without the cherries in the photo. They ate the whole thing...okay, not in one sitting, this time.  The husband's recommendation was to not lose the recipe, and it would be awesome in the summer. Both number one and number two asked if it was made of ice cream. I guess, technically, yes it was--although it was whipped cream, frozen. Number one was happy it was not primarily coconut, he likes the addition of pineapple for the pina colada taste much better. Number three asked if I would make that again when he was home over the summer. Of course, being, as his brothers call him, the "Wonder Child" I will certainly honor his request--just to add fodder to his brothers' illusions.
   They all commented that the toasted coconut crust was really good, and a nice change from the standard pie crust or Graham cracker crust, so in the spirit of March madness, I guess I landed a three-pointer! Woo who!
   Let me know how yours turns out.  Until next time--enjoy!

Pina Colada Torte for National Coconut Day.


Sunday, March 11, 2012

New (?) Direction./Bread Dough

   Hello, all! The next 15 weeks I will be embarking on a new direction--not only in life, but also in my blog.  As part of a class I am taking at ESC, I have to make periodic entries into this blog. Talk about being right up my alley! Imagine, having to jabber away about something I am passionate about; or rather being encouraged to post my stories of how the foods I prepare are woven into my family's life. I have entered the first stage of heaven.
Writing about cooking: that's me wrapped up in a nice little gift package.
   In celebration of my good fortune, I am embarking on a quest to make good meals for the family, as you all know, we eat dinner together most nights, but with classes starting, I need to find easy preparations that don't skimp on taste. The husband will be the first to notice if I get too careless and start serving packaged foods. And my ankles will show it, as well, as they start to swell from all the preservatives and sodium that makes pre-packaged foods so unhealthy. Both alternatives are to be avoided.
   So where do I start? 
   I think a crock-pot full of meatballs with homemade Italian bread are in order. Meatball heroes will serve both as a dinner and a lunch, or two, for the guys at the shop during the week. Yes, they are the extended family of guinea pigs for my escapades in the kitchen. (Insert evil laugh).
   Just so we are clear: I will not just serve meatball heroes for dinner, but will also serve at least a tossed salad, and possibly some fried artichoke hearts or cauliflower with a dipping sauce, followed an hour, or so, later, by some dessert fare. That, to me is a dinner; where just a hero is fine for lunch, or a Sunday evening supper after a dinner was served at two or three o'clock, although, we seem to have gotten away from the early Sunday dinners and evening suppers, as of late.
    The Italian bread recipe I use is so easy, especially for those who don't like to knead, or in my case, have trouble kneading--my hands cramp up after a few minutes, so I often did not get the dough fully kneaded, which resulted in less than fully risen bread-stuff. However, my darling spouse bought me a Kitchen Aid® stand mixer a few years back and now I do not have to worry about under-kneading. I use this recipe anyway, and it always comes out perfect. I have to give a shout-out to my friend, Donna, for this recipe, and technique, as since I got this recipe a year ago, I generally use only this recipe for all my loaf and round breads, as well as cinnamon buns and monkey bread. I use it so often, I don't even have to refer to the written instructions anymore.

                   Easy Bread Dough 
1/2 cup warm water--up to 117°F. Too hot and you will kill the yeast
1 package instant dry yeast (or 2 1/4 teaspoons)
Add the yeast to the water. Stir and set aside.

In a 2 cup measuring cup add:
1 cup warm water
2 tablespoons sugar
1/2 teaspoon salt (aids in rising)
2 tablespoons butter (unsalted) melted
Mix together until the sugar and salt are dissolved. Add yeast mixture (which should be a little foamy on the top). Stir.

Pour the mixture into the bowl of your Kitchen Aid® and add 3 cups of unbleached white flour. You can use 1 cup of whole wheat in place of 1 cup of the all purpose flour, if you wish. I have done so several times, but you might have to "tweak" the amount of water or flour as you proceed. Turn the mixer on to stir in the flour. You will notice it looks like doing this by hand, as you make a well in the center of the mound of flour, add the liquid and slowly work the flour into the liquid until you have a soft dough. If you are doing this by hand, turn out onto floured surface and gradually add more flour, kneading in after each addition, until you have a nice firm, but not stiff dough, that is not sticky. If your dough is sticky, knead in more flour; if it is too stiff, you will have to add some more warm water, but if you knead in the flour slowly this rarely happens. The recipe says you will use between 4 and 5 cups of flour--we all know this depends on the humidity of the day, and the room. Flour can be very thirsty one day, and the next, not so much.I have never used more than 4 1/2 cups of flour, and most of the time I only use 4 cups. .
   Once you have the right consistency, knead dough (if by hand) for one minute, let rest 10 minutes, covered. Knead another one minute, rest another 10 minutes, again covered. Divide into two parts, and shape into your desired shape. Place on greased sheet pan, cover with greased plastic wrap and a kitchen towel, let rise in warm place until double. Bake at 350°F for 30 minutes. Cool on wire rack. After completely cooled you can wrap tightly in plastic, but do plan to use it within the next day or two. There are no preservatives in homemade bread, so it will mold sooner rather than later. Hey, there is the lesson within a lesson for the day--if it takes a long time for your store-bought bread to mold--there are plenty of preservatives in it and therefore should be avoided in the future.
    Now, I do a slightly different procedure with the kneading as I use the stand mixer. I knead in the flour gradually, and once I get the consistency I am looking for I let the mixer knead the dough for about five minutes, then put it in a greased bowl and let it rise for about an hour and half, until double, then I shape it and let it rise again until double. I use either an egg wash (one egg beaten with 1 tablespoon water) or swab the loaves with olive oil, sprinkle with sesame seed, and sometimes granulated garlic and bake as directed.
  The shaping is where you can get inventive. I found the best thing to do is to roll out the dough into a rectangle and roll up from the short edge very tightly, sealing the edge and ends. It comes out exactly like Italian bread from the Italian bakeries I remember as a kid when I visited relatives in downtown Brooklyn. Who knew? I certainly didn't but now that I do, I almost always use that method and between the recipe and shaping method I have never been disappointed.
    Rolling the dough out is how you make the cinnamon rolls, also, slathering butter, and sprinkling cinnamon and sugar over the dough before rolling and slicing into individual rolls. Place in a greased round cake pans. Use butter, cinnamon & sugar across the top and bake away. The aroma, whether it be Italian bread or the cinnamon rolls is absolutely divine. You can top the cinnamon rolls, fresh out of the oven, with icing made of 1 cup powdered sugar, about 1 tablespoon of milk, and a drop of vanilla. Add the milk by 1/2 teaspoons til you get a consistency of while glue--you know the stuff that you used in school in the squeeze bottle. The icing will melt and cover the top. Let it cool a bit before you attempt to bite in--hot sugar is about the same temperature as the surface of the Sun. Trust me on that one.
   Of course, I digress, yet again. 
  Here are a couple of photos; one of the risen dough; and one of the formed loaves waiting to rise. Of course, I got caught up again in life and failed to get photos of the risen dough, and the cooked bread. Naturally, because I served it for dinner before continuing this entry there is less than half a loaf left, so I will not tease you with that but will post my next results, if I can keep life from distracting me.

    Love when dough does what it is supposed to do!
  I forgot to mention that you also slash the top of the dough every two inches or so across the top.


   You should give this recipe a try if you want to try some homemade bread, it is by far the easiest recipe ever! Feel free to post your results too, as I would love to hear how yours come out.
   Until next time--enjoy!